我们回顾一下Office 365 App开发的三种模式
SharePoint-hosted: SharePoint托管,可以使用CSOM(javascript+html)访问SP对象,不能写服务器代码。你可以使用NAPA开发SharePoint APP或者VS2013开发App。
Provider-Hosted: 供应商托管,我理解是代码运行在其它web服务上,可以使用的代码不限制,例如c#, jsp,php都可以,然后通过SharePoint提供的接口(OAuthor,CSOM等)访问等对象和数据。
Autohosted:自动托管,可以写C#代码运行在Azure云服务器上,数据库运行在SQL-Azure上,SharePoint自动和Azure沟通。使用VS2013开发。今天的代码就是这个方式,已知的限制是Office App市场暂时不接受这种App。
先来看一下效果,服务器代码执行一个查询,数据存储在SQL - Azure里面
Configure the sample配置例子代码
- Open Visual Studio 2012 with administrator privileges.(以管理员身份运行VS2012我的是VS2013)
- On the File menu, click Open, Project/Solution and then navigate to the folder where you unzipped the O365_SharePointAuthoHosted.sln file, select it and click Open.(在VS里面打开解压的代码项目文件O365_SharePointAuthoHosted.sln)
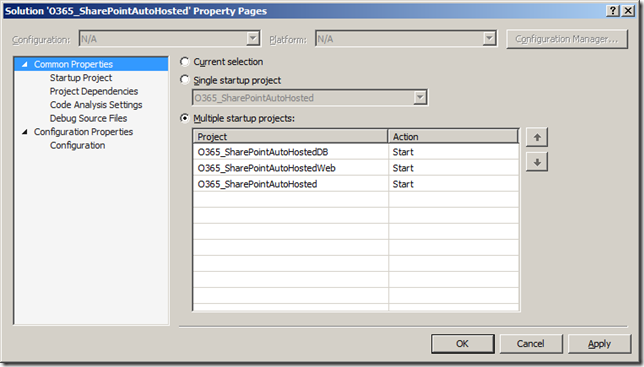
- Right-click the O365_SharePointAutoHosted solution in the Solution Explorer, click Properties, and on the Property Pages pane, make sure the Multiple startup projects option is selected and then change the Action for the O365_SharePointAutoHostedDB to Start instead of None. This will execute the database project and generate your database when you build the project.(在项目文件的“属性”里面确定“Multiple startup projects”是勾选的,O365_SharePointAutoHostedDB的Action 为Start)
- To generate a DACPAC file, right-click the O365_SharePointAutoHostedDB database project in the Solution Explorer, and then click Build. This creates a database with tables and provides you the DACPAC file in the Debug folder if you are working in the Debug mode; otherwise, you should find it in the Release folder. The file path will be similar to [Your application root folder name]\O365_SharePointAutoHostedDB\bin\Debug\O365_SharePointAutoHostedDB.dacpac.(选择O365_SharePointAutoHostedDB项目,执行编译)
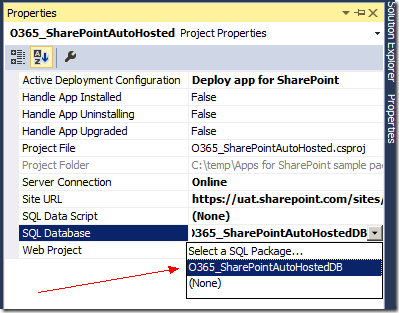
- To link your database project to the solution, select the O365_SharePointAutoHosted project in the Solution Explorer and in the Properties pane below the Solution Explorer, click on the down arrow in the SQL Databasefield and then Select the SQL Package and navigate to the location on your computer where the DACPAC file is located.(在O365_SharePointAutoHosted项目的属性选择刚才生成的DACPAC文件或干脆选择整个DB项目)
- In the O365_SharePointAutoHosted Web project, add a SqlAzureConnectionString property in the <appSettings> section of the Web.config file.XML(确定O365_SharePointAutoHosted Web项目的web.config文件里面包含数据库连接串)
<add key="SqlAzureConnectionString" value="Data Source=(localdb)\Projects;
Initial Catalog=O365_SharePointAutoHostedDB;Integrated Security=True;
Connect Timeout=30;Encrypt=False;TrustServerCertificate=False" />
- Select the O365_SharePointAutoHosted project in the Solution Explorer and in the Properties pane below, enter the URL of your Office 365 Developer Site into the Site URL property field.(在O365_SharePointAutoHosted项目的”Site Url填入你的O365开发网站地址)
Build the sample(编译项目)
The app for SharePoint can now be uploaded to the App Catalog of a SharePoint Online tenancy. For further debugging, you can deploy the app directly from Visual Studio 2012 to a SharePoint Online website if it was created with the site template. To do this, right-click the O365_SharePointAutoHosted solution in Solution Explorer and select Deploy. Tenant administrators can install the app for SharePoint on their Office 365 Developer Site tenancy by using the following procedure:
- Right-click the O365_SharePointAutoHosted solution and select Publish.(编译O365_SharePointAutoHosted生成app文件)
- On the Publish Summary page select the Open output folder after successful packaging option and then click Finish.
- A folder that contains the O365_SharePointAutoHosted.app file opens--note the file location. The file path will be similar to [Your application root folder name]\O365_SharePointAutoHosted\O365_SharePointAutoHosted\O365_SharePointAutoHosted\bin\Debug\app.publish\1.0.0.0\ O365_SharePointAutoHosted.app.(一般生成的app在这个目录)
Run and test the sample(运行和测试例子代码)
- Open your Office 365 Developer Site.(打开O365的开发人员网站)
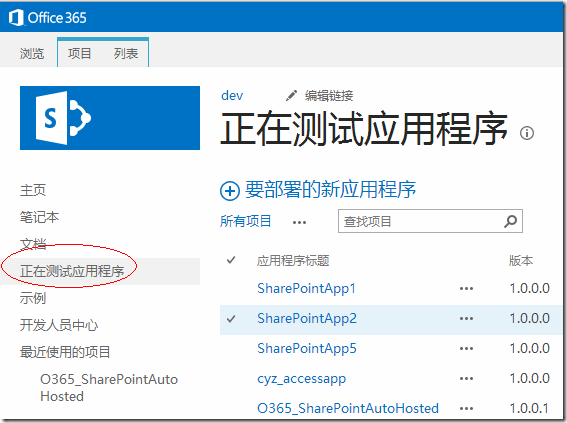
- On the Developer Site, in the Apps in Testing list, click the plus sign next to the text new app to deploy.(点击右手边的“正在测试应用程序”)
- On the Deploy App page, click the link text upload.(点击“要部署的新应用程序”)
- Navigate to the location of O365_SharePointAutoHosted.app, select it and click OK.(选择上面编译生成的app文件O365_SharePointAutoHosted.app,上传)
- Click Deploy and on the next dialog click Trust it.(下一步选择“部署”,点击“信任”)
- The application will be uploaded to your Office 365 Developer Site.(上传完成后,后台开始部署,部署完成后就可以点击刚才的app进行测试了)
- On your Developer Site, in the Apps in Testing directory, click the O365_SharePointAutoHosted app to run it.
- On the page titled "Office 365 Sample Code: SharePoint Auto-Hosted App" you can enter any of the EmployeeNames you find in the Script.PostDeployment1.sql file of the O365_SharePointAutoHostedDB project. You can also enter the character "%" to view all the items in the database.The entire list is shown in the following figure.
Office 365 App开发之Autohosted模式源代码下载
例子代码说明的效果如下:
注:一开始以为它上面使用%号可以查询,发现代码里面写的是等号,根据不可能模糊查询,所以要改一下代码
![image_thumb4[1] image_thumb4[1]](https://www.myoknow.com/wp-content/uploads/2013/12/image_thumb41_thumb.png)


![sharepointautohostedemployeelist---c[3] sharepointautohostedemployeelist---c[3]](https://www.myoknow.com/wp-content/uploads/2013/12/sharepointautohostedemployeelist-c3_thumb.jpg)
